Earn
Automating Lazy River Rewards Claims with Gelato


It’s been almost three months since the launch of Lazy River, our PERP staking program on Optimism, and we’d paid out almost $250,000 in USDC directly from the trading fees generated by Perp.
That means anyone can earn a passive stream of stables by locking PERP into vePERP. It’s simple and you can lock and chill back, knowing that as long as traders are expressing their market views on Perp, you’ll continue to earn a share of the fees they pay.
Read more about Lazy River and stake your claim to a share of Perp’s trading fees here.
In this article, we’re going to show you how to make Lazy River even lazier! Instead of claiming your rewards each week manually, we’ll provide a step-by-step walkthrough of how to use Gelato Network to automate the process of collecting your yield.
Getting Started with Gelato Network
Gelato Network’s Automate service allows you to automate smart contracts in a reliable and decentralized way so you don’t have to claim your vePERP staking rewards each week manually.
Learn more about the benefits of holding vePERP, such as fee sharing, boosted voting power and referral rewards, here.
Head to Gelato and click on “Connect Wallet”. Make sure you connect via the Optimism network.
Click on “Create Task” to start automating a smart contract. You can also use the tutorial on Gelato to get familiar with the process before setting up an automated way of claiming Lazy River rewards.
Lock PERP and stake your claim to a share of Perp’s trading fee revenues with Lazy River.
Automating the Claiming of USDC Rewards
To automate your USDC reward claims every week, we first need to know the smart contract to interact with. By using this link, you can find and verify the smart contracts for vePERP.
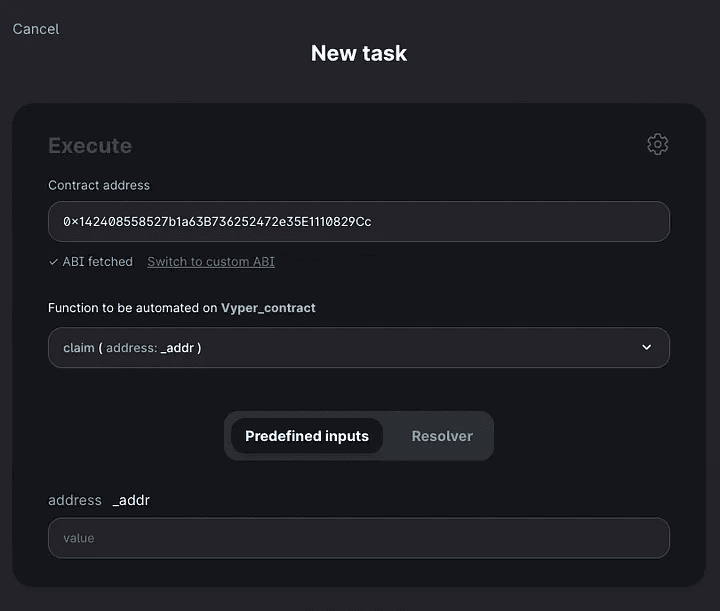
For claiming USDC, the contract of interest is called USDCFeeDistributor: 0x142408558527b1a63B736252472e35E1110829Cc.
Enter this contract address and then select the “ claim(address: _adr) “ function. Underneath predefined inputs, put your Optimism address you are using to stake PERP into the ‘address’ field.
The next step is to check the date and time of the next reward distribution (every Thursday), which can be found on the Lazy River page.
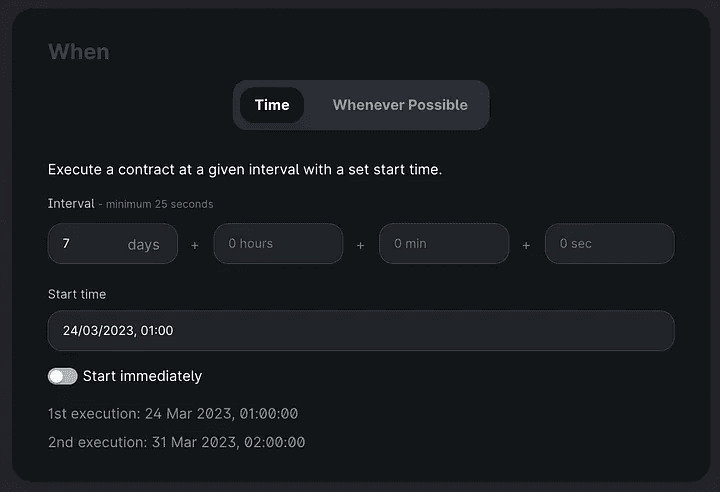
In the following step, we need to specify how often and when to execute the task. Since Lazy River rewards are paid out weekly, we select 7 days as the interval to auto-claim the USDC rewards.
Since each fee distribution occurs on a Thursday, we can select a start time of early Friday morning. In our example, we’ll set the first execution data and time to Friday March 24th, 01:00 GMT.
The next step is to decide how the task should be paid for. To automate the claiming of USDC and vePERP rewards from Lazy River, you’ll need to add some funds to Gelato Network to pay for gas. Enter the amount in ETH you want to deposit. Claiming USDC rewards usually costs somewhere around $0.20, so ~$2 of ETH should be good for at least 10 weeks.
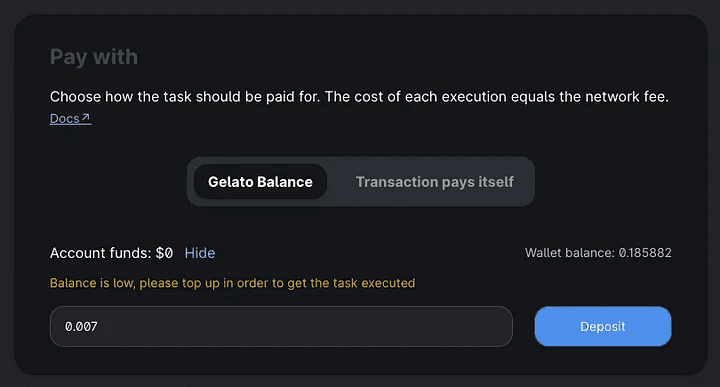
After entering the amount, click on the “Deposit” button then confirm the transaction in your wallet.
The last step is to give the task a name and then create it so the task is up and running, ready to auto-claim your USDC rewards every week!
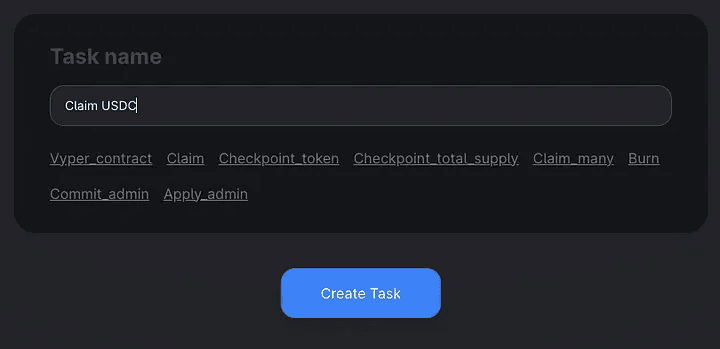
After creating the task, you’ll need to sign a message in your wallet and send a transaction to initiate automated claiming.
And that’s it! You no longer have to claim your USDC rewards each week manually.
Once the setup process is finished, you should see something like the screenshot below.
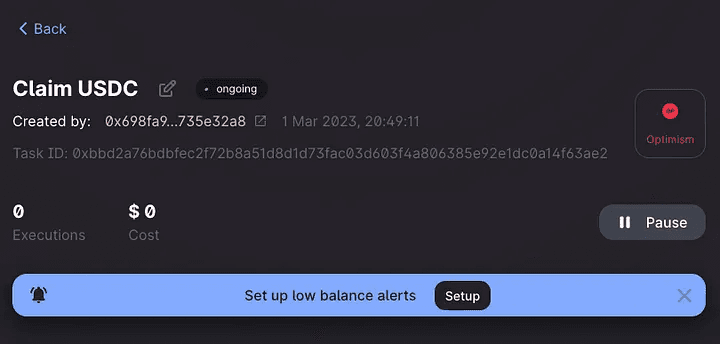
Note that the task can be paused at any time. After a while, your ETH balance on Gelato will eventually be depleted due to the gas costs involved with claiming your rewards, so you can also set up a low balance alert to remind you to deposit more ETH for the task so it can continue to execute the claims.
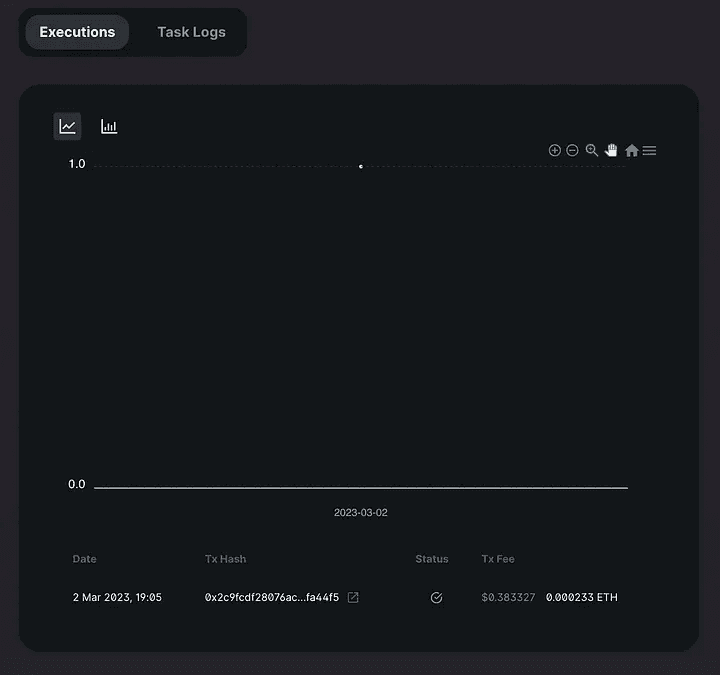
Once the task has been executed, you’ll be able to see the date/time, transaction hash, status and transaction fee paid.
Let’s now look at how to automate the claiming of vePERP rewards.
Automating the Claiming of vePERP Rewards
For the vePERP rewards, you have to create a new task since it’s a separate contract. Again, you can verify the contract for yourself here.
The relevant contract in this case is called vePERPEmissionFeeDistributor and the contract address is 0x5Ebe7ee72ab56f82194e61D95d5A0a32CdF722E1.
We should follow the same steps as outlined above to automate the claiming process, but this time with the contract address above. First, enter the contract address, select the “claim(address: _adr) “ function and then input the Optimism address that you are staking with.
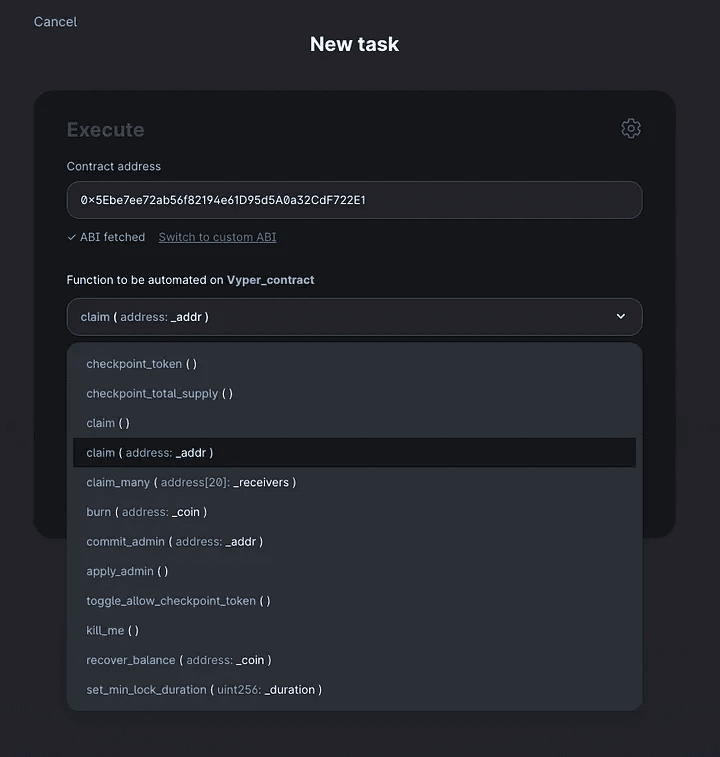
Then we must set when the task is executed, using the same interval (7 days) and start time as the USDC auto-claim.

Since we’ve already deposited some ETH to Gelato, we can just continue with the default selection of the Gelato Balance in the Pay with section.
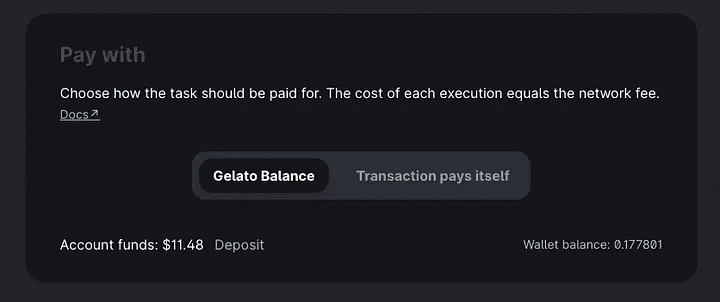
The last step is to give your task a name, then click on the “Create Task” button.
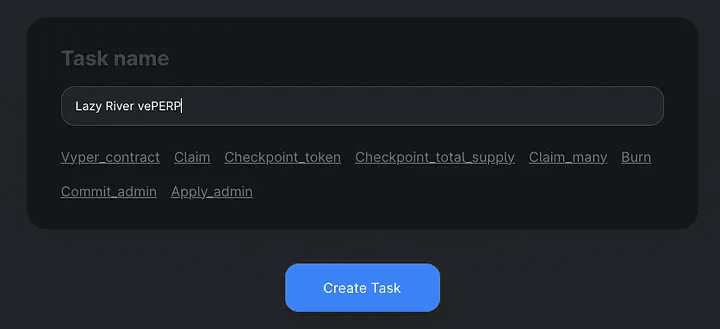
After clicking on “Create Task”, you’ll be prompted to sign a message and confirm a transaction in your wallet. Once confirmed, your task will start running and you’ll see something similar to the page below.
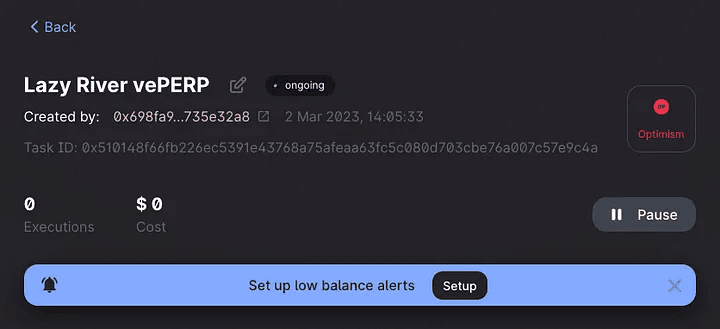
As with the USDC claiming task, you can pause it at any time. Once the first interval has passed and the vePERP has been auto-claimed, the executions will be shown as well as the associated gas costs.
After following all of these steps, you’ll no longer need to claim your vePERP rewards manually. Your vePERP balance will now automatically increase every week, compounding your gains!
In this guide, we’ve set a weekly interval for the claiming processes, which for vePERP, allows you to auto-compound your gains. But you also have the option of setting the interval to two weeks, three weeks or whichever frequency you wish.
However, if you wait several weeks to claim vePERP rewards, then you miss out on increasing your earnings, since a snapshot of your balance for the following week’s distribution is taken every Thursday. As a result, it’s optimal (although not necessary) to claim vePERP rewards every week as soon as possible after each distribution occurs.
It’s been almost three months since the launch of Lazy River, our PERP staking program on Optimism, and we’d paid out almost $250,000 in USDC directly from the trading fees generated by Perp.
That means anyone can earn a passive stream of stables by locking PERP into vePERP. It’s simple and you can lock and chill back, knowing that as long as traders are expressing their market views on Perp, you’ll continue to earn a share of the fees they pay.
Read more about Lazy River and stake your claim to a share of Perp’s trading fees here.
In this article, we’re going to show you how to make Lazy River even lazier! Instead of claiming your rewards each week manually, we’ll provide a step-by-step walkthrough of how to use Gelato Network to automate the process of collecting your yield.
Getting Started with Gelato Network
Gelato Network’s Automate service allows you to automate smart contracts in a reliable and decentralized way so you don’t have to claim your vePERP staking rewards each week manually.
Learn more about the benefits of holding vePERP, such as fee sharing, boosted voting power and referral rewards, here.
Head to Gelato and click on “Connect Wallet”. Make sure you connect via the Optimism network.
Click on “Create Task” to start automating a smart contract. You can also use the tutorial on Gelato to get familiar with the process before setting up an automated way of claiming Lazy River rewards.
Lock PERP and stake your claim to a share of Perp’s trading fee revenues with Lazy River.
Automating the Claiming of USDC Rewards
To automate your USDC reward claims every week, we first need to know the smart contract to interact with. By using this link, you can find and verify the smart contracts for vePERP.
For claiming USDC, the contract of interest is called USDCFeeDistributor: 0x142408558527b1a63B736252472e35E1110829Cc.
Enter this contract address and then select the “ claim(address: _adr) “ function. Underneath predefined inputs, put your Optimism address you are using to stake PERP into the ‘address’ field.

The next step is to check the date and time of the next reward distribution (every Thursday), which can be found on the Lazy River page.
In the following step, we need to specify how often and when to execute the task. Since Lazy River rewards are paid out weekly, we select 7 days as the interval to auto-claim the USDC rewards.
Since each fee distribution occurs on a Thursday, we can select a start time of early Friday morning. In our example, we’ll set the first execution data and time to Friday March 24th, 01:00 GMT.

The next step is to decide how the task should be paid for. To automate the claiming of USDC and vePERP rewards from Lazy River, you’ll need to add some funds to Gelato Network to pay for gas. Enter the amount in ETH you want to deposit. Claiming USDC rewards usually costs somewhere around $0.20, so ~$2 of ETH should be good for at least 10 weeks.

After entering the amount, click on the “Deposit” button then confirm the transaction in your wallet.
The last step is to give the task a name and then create it so the task is up and running, ready to auto-claim your USDC rewards every week!

After creating the task, you’ll need to sign a message in your wallet and send a transaction to initiate automated claiming.
And that’s it! You no longer have to claim your USDC rewards each week manually.
Once the setup process is finished, you should see something like the screenshot below.

Note that the task can be paused at any time. After a while, your ETH balance on Gelato will eventually be depleted due to the gas costs involved with claiming your rewards, so you can also set up a low balance alert to remind you to deposit more ETH for the task so it can continue to execute the claims.
Once the task has been executed, you’ll be able to see the date/time, transaction hash, status and transaction fee paid.

Let’s now look at how to automate the claiming of vePERP rewards.
Automating the Claiming of vePERP Rewards
For the vePERP rewards, you have to create a new task since it’s a separate contract. Again, you can verify the contract for yourself here.
The relevant contract in this case is called vePERPEmissionFeeDistributor and the contract address is 0x5Ebe7ee72ab56f82194e61D95d5A0a32CdF722E1.
We should follow the same steps as outlined above to automate the claiming process, but this time with the contract address above. First, enter the contract address, select the “claim(address: _adr) “ function and then input the Optimism address that you are staking with.

Then we must set when the task is executed, using the same interval (7 days) and start time as the USDC auto-claim.

Since we’ve already deposited some ETH to Gelato, we can just continue with the default selection of the Gelato Balance in the Pay with section.

The last step is to give your task a name, then click on the “Create Task” button.

After clicking on “Create Task”, you’ll be prompted to sign a message and confirm a transaction in your wallet. Once confirmed, your task will start running and you’ll see something similar to the page below.

As with the USDC claiming task, you can pause it at any time. Once the first interval has passed and the vePERP has been auto-claimed, the executions will be shown as well as the associated gas costs.
After following all of these steps, you’ll no longer need to claim your vePERP rewards manually. Your vePERP balance will now automatically increase every week, compounding your gains!
In this guide, we’ve set a weekly interval for the claiming processes, which for vePERP, allows you to auto-compound your gains. But you also have the option of setting the interval to two weeks, three weeks or whichever frequency you wish.
However, if you wait several weeks to claim vePERP rewards, then you miss out on increasing your earnings, since a snapshot of your balance for the following week’s distribution is taken every Thursday. As a result, it’s optimal (although not necessary) to claim vePERP rewards every week as soon as possible after each distribution occurs.
It’s been almost three months since the launch of Lazy River, our PERP staking program on Optimism, and we’d paid out almost $250,000 in USDC directly from the trading fees generated by Perp.
That means anyone can earn a passive stream of stables by locking PERP into vePERP. It’s simple and you can lock and chill back, knowing that as long as traders are expressing their market views on Perp, you’ll continue to earn a share of the fees they pay.
Read more about Lazy River and stake your claim to a share of Perp’s trading fees here.
In this article, we’re going to show you how to make Lazy River even lazier! Instead of claiming your rewards each week manually, we’ll provide a step-by-step walkthrough of how to use Gelato Network to automate the process of collecting your yield.
Getting Started with Gelato Network
Gelato Network’s Automate service allows you to automate smart contracts in a reliable and decentralized way so you don’t have to claim your vePERP staking rewards each week manually.
Learn more about the benefits of holding vePERP, such as fee sharing, boosted voting power and referral rewards, here.
Head to Gelato and click on “Connect Wallet”. Make sure you connect via the Optimism network.
Click on “Create Task” to start automating a smart contract. You can also use the tutorial on Gelato to get familiar with the process before setting up an automated way of claiming Lazy River rewards.
Lock PERP and stake your claim to a share of Perp’s trading fee revenues with Lazy River.
Automating the Claiming of USDC Rewards
To automate your USDC reward claims every week, we first need to know the smart contract to interact with. By using this link, you can find and verify the smart contracts for vePERP.
For claiming USDC, the contract of interest is called USDCFeeDistributor: 0x142408558527b1a63B736252472e35E1110829Cc.
Enter this contract address and then select the “ claim(address: _adr) “ function. Underneath predefined inputs, put your Optimism address you are using to stake PERP into the ‘address’ field.

The next step is to check the date and time of the next reward distribution (every Thursday), which can be found on the Lazy River page.
In the following step, we need to specify how often and when to execute the task. Since Lazy River rewards are paid out weekly, we select 7 days as the interval to auto-claim the USDC rewards.
Since each fee distribution occurs on a Thursday, we can select a start time of early Friday morning. In our example, we’ll set the first execution data and time to Friday March 24th, 01:00 GMT.

The next step is to decide how the task should be paid for. To automate the claiming of USDC and vePERP rewards from Lazy River, you’ll need to add some funds to Gelato Network to pay for gas. Enter the amount in ETH you want to deposit. Claiming USDC rewards usually costs somewhere around $0.20, so ~$2 of ETH should be good for at least 10 weeks.

After entering the amount, click on the “Deposit” button then confirm the transaction in your wallet.
The last step is to give the task a name and then create it so the task is up and running, ready to auto-claim your USDC rewards every week!

After creating the task, you’ll need to sign a message in your wallet and send a transaction to initiate automated claiming.
And that’s it! You no longer have to claim your USDC rewards each week manually.
Once the setup process is finished, you should see something like the screenshot below.

Note that the task can be paused at any time. After a while, your ETH balance on Gelato will eventually be depleted due to the gas costs involved with claiming your rewards, so you can also set up a low balance alert to remind you to deposit more ETH for the task so it can continue to execute the claims.
Once the task has been executed, you’ll be able to see the date/time, transaction hash, status and transaction fee paid.

Let’s now look at how to automate the claiming of vePERP rewards.
Automating the Claiming of vePERP Rewards
For the vePERP rewards, you have to create a new task since it’s a separate contract. Again, you can verify the contract for yourself here.
The relevant contract in this case is called vePERPEmissionFeeDistributor and the contract address is 0x5Ebe7ee72ab56f82194e61D95d5A0a32CdF722E1.
We should follow the same steps as outlined above to automate the claiming process, but this time with the contract address above. First, enter the contract address, select the “claim(address: _adr) “ function and then input the Optimism address that you are staking with.

Then we must set when the task is executed, using the same interval (7 days) and start time as the USDC auto-claim.

Since we’ve already deposited some ETH to Gelato, we can just continue with the default selection of the Gelato Balance in the Pay with section.

The last step is to give your task a name, then click on the “Create Task” button.

After clicking on “Create Task”, you’ll be prompted to sign a message and confirm a transaction in your wallet. Once confirmed, your task will start running and you’ll see something similar to the page below.

As with the USDC claiming task, you can pause it at any time. Once the first interval has passed and the vePERP has been auto-claimed, the executions will be shown as well as the associated gas costs.
After following all of these steps, you’ll no longer need to claim your vePERP rewards manually. Your vePERP balance will now automatically increase every week, compounding your gains!
In this guide, we’ve set a weekly interval for the claiming processes, which for vePERP, allows you to auto-compound your gains. But you also have the option of setting the interval to two weeks, three weeks or whichever frequency you wish.
However, if you wait several weeks to claim vePERP rewards, then you miss out on increasing your earnings, since a snapshot of your balance for the following week’s distribution is taken every Thursday. As a result, it’s optimal (although not necessary) to claim vePERP rewards every week as soon as possible after each distribution occurs.
